
Package Management
Node.js is a javascript embed environment, similar to a web browser, that can interpret and respond to calls in javascript and has built in web server functionality.

Node provides the framework for programming in modules, many of which are hosted on Github and managed with NPM, the Node Package Manager

NPM runs in the terminal on a Mac or the prompt in Windows.
package.json
Each Node.js project requires a package.json file, which gives metadata about the project, as well as lists the Node.js modules the project depends upon to run.
npm install
By typing this in the top-level directory of a Node.js project, NPM will automatically fetch the necessary modules from Github and store them locally for use in your project.
var five = require("johnny-five");
Once you have used NPM to make local copies of the module dependencies - and recursively their dependencies - you will be able to use the require function to load in any of the functionality of these modules.
Demo
Begin by creating a new repository in your personal Github account called:
johnny-five-tutorial
Choose to create a default README.md file, a .gitignore file with Node.js defaults and select the MIT license, then clone the repository to your local computer, open in Sublime Text 2 and create a new file at the top level called:
package.json
Open package.json, copy-paste the code below, update the author information and save:
{
    "name": "johnny-five-tutorial",
    "description": "A Johnny-Five tutorial test project",
    "version": "0.0.1",
    "author": {
        "name": "Your Name <your@email.com>",
        "email": "your@email.com"
    },
    "dependencies": {
        "johnny-five": ">= 0.7.3"
    },
    "engines": {
        "node": ">=0.10.0"
    }
}
Now create another new file at the top-level called:
app.js
Then copy-paste the code below and save.
   var five = require("johnny-five"),
        board, photoresistor;

    board = new five.Board();

    board.on("ready", function() {

      // Create a new `photoresistor` hardware instance.
      photoresistor = new five.Sensor({
        pin: "A2",
        freq: 250
      });

      // Inject the `sensor` hardware into
      // the Repl instance's context;
      // allows direct command line access
      board.repl.inject({
        pot: photoresistor
      });

      // "data" get the current reading from the photoresistor
      photoresistor.on("data", function() {
        console.log( this.value );
      });
    });


    // References
    //
    // http://nakkaya.com/2009/10/29/connecting-a-photoresistor-to-an-arduino/
Code source in Johnny-Five examples.
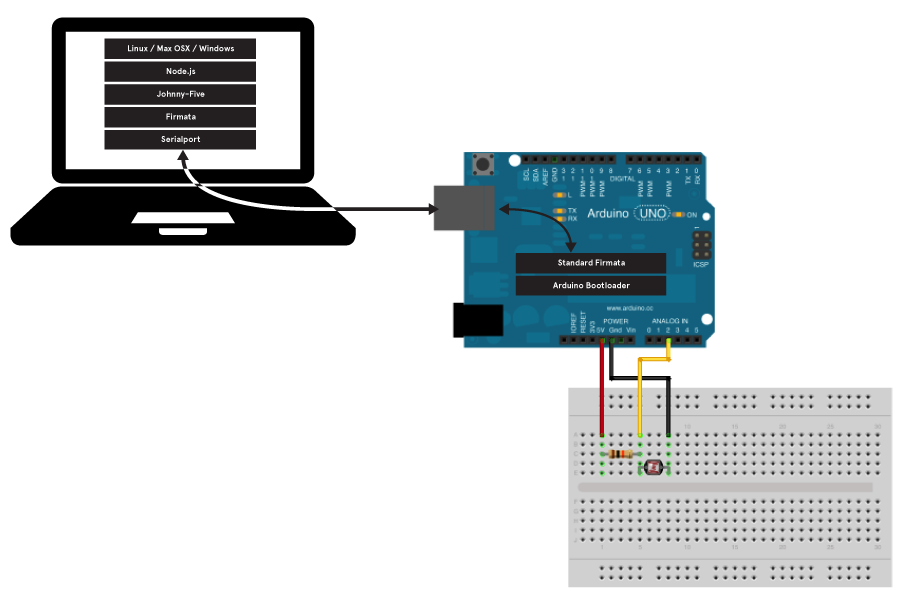
Now setup your Arduino Uno as per the schematic below:

Then connect the Arduino Uno to your computer with a USB cable as below.
If you are using a Mac or Linux, open Terminal and type:
pwd
This will tell you what directory you are in, which you can navigate out of using the cd command to change directory:
cd .. //to go up a level
cd directory_name //to enter a directory
You can also use the ls command to list the sub-directories of your present working directory:
ls // will list the sub-directories of your pwd
ls -laH // will provide the same list with more information
If you are on a Windows machine, open the DOS Prompt and type:
cd
This will tell you what directory you are in, which you can navigate out of using the same cd command to change directory:
cd .. //to go up a level
cd directory_name //to enter a directory
You can also use the dir command to list the sub-directories of your present working directory:
dir // will list the sub-directories of your pwd
Once you are in your johnny-five-tutorial directory, type the following followed by return:
npm install
This will install all the module dependencies that you listed in your package.json file, as well as all of the dependencies of those dependencies recursively, storing them in a node_modules directory. Once this has completed, you can type the following followed by return:
node app.js
